Ichimoku is a finely-tuned, integrated charting system where the five lines all work in concert to produce the end result. We emphasize the word "system" here because it is absolutely key to understanding how to use the various trading strategies we outline in this section.
Every strategy covered below is to be used and measured against the prevailing Ichimoku "picture" rather than in isolation. This means that, while a scenario that matches a given strategy may have transpired, you still must weigh that signal against the rest of the chart in order to determine whether or not it offers a high-probability trade. Another way of looking at it is that Ichimoku is a system and the discrete strategies for trading it are merely "sub-systems" within that larger system. Thus, looking at trading any of these strategies from an automated or isolated approach that doesn't take into account the rest of what the Ichimoku chart is telling you will meet with mixed long-term success, at best.
Don't misinterpret the message; the strategies outlined below are very powerful and can bring consistent results if used wisely - which is within the scope of the larger Ichimoku picture. We ask that you always keep this in mind when employing these strategies
Tenkan Sen/Kijun Sen Cross
The tenkan sen/kijun sen cross is one of the most traditional trading strategies within the Ichimoku Kinko Hyo system. The signal for this strategy is given when the tenkan sen crosses over the kijun sen. If the tenkan sen crosses above the kijun sen, then it is a bullish signal. Likewise, if the tenkan sen crosses below the kijun sen, then that is a bearish signal. Like all strategies within the Ichimoku system, the tenkan sen/kijun sen cross needs to be viewed in terms of the bigger Ichimoku picture before making any trading decisions, as this will give the strategy the best chances of success.
In general, the tenkan sen/kijun sen strategy can be classified into three (3) major classifications: strong, neutral and weak.
STRONG TENKAN SEN/KIJUN SEN CROSS SIGNAL
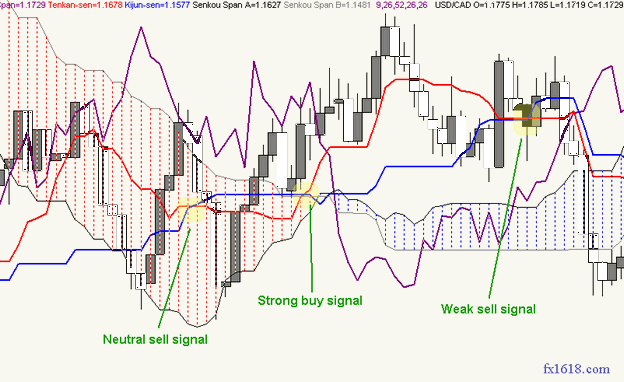
A strong tenkan sen/kijun sen cross Buy signal takes place when a bullish cross happens above the kumo.
A strong tenkan sen/kijun sen cross Sell signal takes place when a bearish cross happens below the kumo.
NEUTRAL TENKAN SEN/KIJUN SEN CROSS SIGNAL
A neutral tenkan sen/kijun sen cross Buy signal takes place when a bullish cross happens within the kumo.
A neutral tenkan sen/kijun sen cross Sell signal takes place when a bearish cross happens within the kumo.
WEAK TENKAN SEN/KIJUN SEN CROSS SIGNAL
A weak tenkan sen/kijun sen cross Buy signal takes place when a bullish cross happens below the kumo.
A weak tenkan sen/kijun sen cross Sell signal takes place when a bearish cross happens above the kumo.
See the chart in Figure I below for an example of several classifications of the tenkan sen/kijun sen cross:
Ichimoku trading strategies
_________________________________________________________
But wait! Have you checked the chikou span?
With these three major classifications in mind, we will add something else into the equation - the chikou span. As we explained in the section detailing the chikou span, this component acts as a "final arbiter" of sentiment and should be consulted with every single trading signal in the Ichimiku Kinko Hyo charting system. The tenkan sen/kijun sen cross is no different. Each of the three classifications of the TS/KS cross mentioned above can be further classified based on the chikou span's location in relation to the price curve at the time of the cross. If the cross is a "Buy" signal and the chikou span is above the price curve at that point in time, this will add greater strength to that buy signal. Likewise, if the cross is a "Sell" signal and the chikou span is below the price curve at that point in time, this will provide additional confirmation to that signal. If the chikou span's location in relation to the price curve is the opposite of the TS/KS cross's sentiment, then that will weaken the signal.
Entry
The entry for the tenkan sen/kijun sen cross is very straightforward - an order is placed in the direction of the cross once the cross has been solidified by a close. Nevertheless, in accordance with good Ichimoku trading practices, the trader should bear in mind any significant levels of support/resistance near the cross and consider getting a close above those levels before executing their order.
Exit
The exit from a tenkan sen/kijun sen cross will vary with the particular circumstances of the chart. The most traditional exit signal is a tenkan sen/kijun sen cross in the opposite direction of your trade. However, personal risk management and time frame concerns may dictate an earlier exit, or an exit based upon other Ichimoku signals, just as in any other trade.
Stop-Loss Placement
The tenkan sen/kijun sen strategy does not dictate use of any particular Ichimoku structure for stop-loss placement, like some other strategies do. Instead, the trader should consider their execution time frame and their money management rules and then look for the appropriate prevailing structure for setting their stop-loss.
Take Profit Targets
Take profit targetting for the tenkan sen/kijun sen cross strategy can be approached in one of two different ways. It can be approached from a day/swing trader perspective where take profit targets are set using key levels, or from a position trader perspective, where the trader does not set specific targets but rather waits for the current trend to be invalidated by a tenkan sen/kijun sen cross transpiring in the opposite direction of their trade.
Case Study
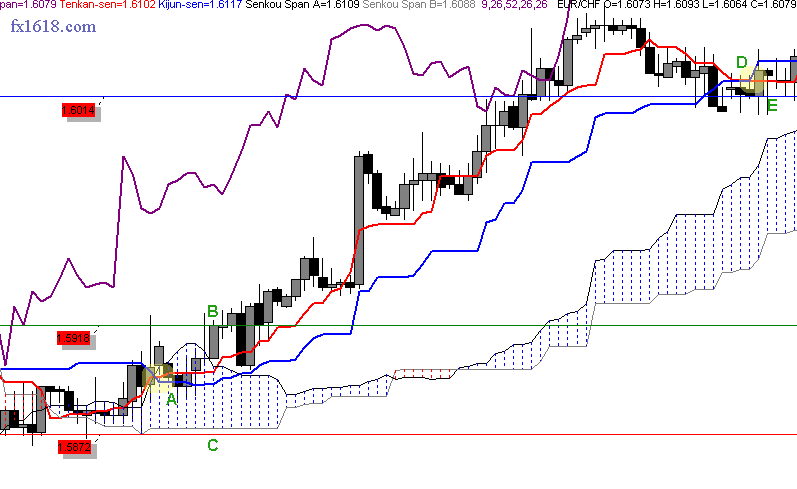
In the 4H chart in Figure II below we can see a bullish tenkan sen/kijun sen cross at point A. Since this cross took place within the kumo itself, it is considered a "neutral" buy signal, thus we wait for price to exit and close above the kumo to confirm this sentiment before placing our long entry. Price does achieve a close above the kumo at point B (1.5918) and we place our long entry at that point. For our stop-loss, we look for the place where our trade sentiment would be invalidated. In this case, the bottom edge of the kumo provides us with just that at point C (1.5872).
Once we place our entry and stop-loss orders, we merely wait for the trade to unfold while keeping an eye out for potential exit signals. Price rises nicely for the next 10 to 11 days and then, on the 15th day of the trade, price drops enough to have the tenkan sen cross below the kijun sen at point D. This is our exit signal, since Ichimoku is telling us that the sentiment has changed, so we close our order at 1.6014 at point E for a total gain of over 95 pips.
For maximum risk management on this trade, we also could have moved our stop-loss up with price once price was a conservative distance away from our entry. One option for doing this would be to move the stop-loss up with the kumo, keeping it just below the bottom edge. For even tighter risk management, we could have moved our stop-loss with the kijun sen, keeping it 5 to 10 pips below that line as it moved up.
Kijun Sen Cross
The kijun sen cross is one of the most powerful and reliable trading strategies within the Ichimoku Kinko Hyo system. It can be used on nearly all time frames with excellent results, though it will be somewhat less reliable on the lower, daytrading time frames due to the increased volatility on those time frames. The kijun sen cross signal is given when price crosses over the kijun sen. If it crosses the price curve from the bottom up, then it is a bullish signal. If it crosses from the top down, then it is a bearish signal. Nevertheless, like all trading strategies within the Ichimoku Kinko Hyo system, the kijun sen cross signal needs to be evaluated against the larger Ichimoku "picture" before committing to any trade.
In general, the kijun sen cross strategy can be classified into three (3) major classifications: strong, neutral and weak.
STRONG KIJUN SEN CROSS SIGNAL
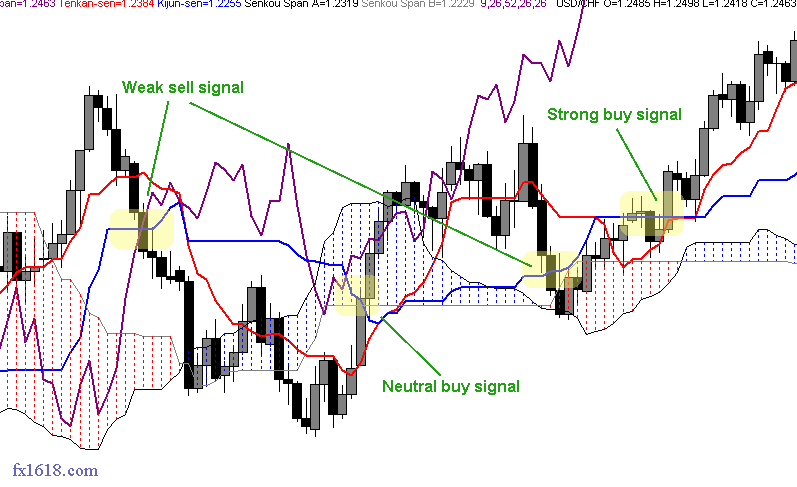
A strong kijun sen cross Buy signal takes place when a bullish cross happens above the kumo.
A strong kijun sen cross Sell signal takes place when a bearish cross happens below the kumo.
NEUTRAL KIJUN SEN CROSS SIGNAL
A neutral kijun sen cross Buy signal takes place when a bullish cross happens within the kumo.
A neutral kijun sen cross Sell signal takes place when a bearish cross happens within the kumo.
WEAK KIJUN SEN CROSS SIGNAL
A weak kijun sen cross Buy signal takes place when a bullish cross happens below the kumo.
A weak kijun sen cross Sell signal takes place when a bearish cross happens above the kumo.
See the chart in Figure III below for an example of several classifications of the kijun sen cross:
See the chart in Figure III below for an example of several classifications of the kijun sen cross:
Chikou span confirmation
As with the tenkan sen/kijun sen cross strategy, the savvy Ichimoku trader will make good use of the chikou span to confirm any kijun sen cross signal. Each of the three classifications of the kijun sen cross outlined above can be further classified based on the chikou span's location in relation to the price curve at the time of the cross. If the cross is a "Buy" signal and the chikou span is above the price curve at that point in time, this will add greater strength to that buy signal. Likewise, if the cross is a "Sell" signal and the chikou span is below the price curve at that point in time, this will provide additional confirmation to that signal. If the chikou span's location in relation to the price curve is the opposite of the kijun sen cross's sentiment, then that will weaken the signal.
Entry
The entry for the kijun sen cross is very straightforward - an order is placed in the direction of the cross once the cross has been solidified by a close. Nevertheless, in accordance with good Ichimoku trading practices, the trader should bear in mind any significant levels of support/resistance near the cross and consider getting a close above those levels before executing their order.
Exit
A trader exits a kijun sen cross trade upon their stop-loss getting triggered when price crossing the kijun sen in the opposite direction of their trade. Thus, it is key that the trader move their stop-loss in lockstep with the movement of the kijun sen in order to maximize their profit.
Stop-Loss Placement
The kijun sen cross strategy is unique among Ichimoku strategies in that the trader's stop-loss is determined and managed by the kijun sen itself. This is due to the kijun sen's strong representation of price equilibrium, which makes it an excellent determinant of sentiment. Thus, if price retraces back below the kijun sen after executing a bullish kijun sen cross, then that is a good indication that insufficient momentum is present to further the nascent bullish sentiment.
When entering a trade upon a kijun sen cross, the trader will review the current value of the kijun sen and place their stop-loss 5 to 10 pips on the opposite side of the kijun sen that their entry is placed on. The exact number of pips for the stop-loss "buffer" above/below the kijun sen will depend upon the dynamics of the pair and price's historical behavior vis-a-vis the kijun sen as well as the risk tolerance of the individual trader, but 5 to 10 pips should be appropriate for most situations. When looking to enter Short, the trader will look to place their stop-loss just above the current kijun sen and when looking to enter Long, the trader will place their stop-loss just below the current kijun sen.
Once the trade is underway, the trader should move their stop-loss up/down with the movement of the kijun sen, always maintaining the 5 to 10 pip "buffer". In this way, the kijun sen itself acts as a "trailing stop-loss" of sorts and enables the trader to keep a tight hold on risk management while maximizing profits.
Take Profit Targets
Take profit targetting for the kijun sen cross strategy can be approached in one of two different ways. It can be approached from a day/swing trader perspective where take profit targets are set using key levels, or from a position trader perspective, where the trader does not set specific targets but rather waits for the current trend to be invalidated by price crossing back over the kijun sen in the opposite direction of their trade.
Case Study
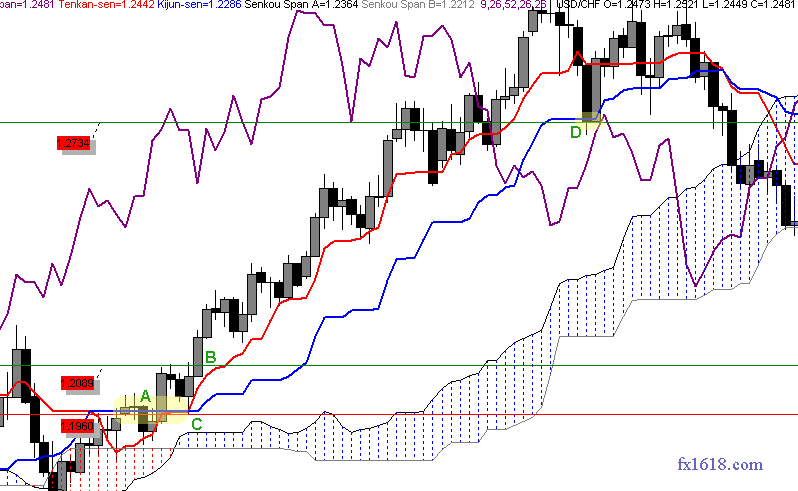
In the 1D chart in Figure IV below for USD/CHF we can see a bullish kijun sen cross at point A. While the initial cross is above the kumo and therefore a relatively strong cross, it is still beneath a very key chikou span level (not visible on this chart), so we wait until we get a close above that key level before entering at point B. At this point, we also have the additional benefit of confirmation from a bullish tenkan sen/kijun sen cross and a nice upward angle to the kijun sen, bolstering our prospects for more bullish price action even more. For our stop-loss, we follow the kijun sen trading strategy guidelines and place it 10 pips below the prevailing kijun sen at point C.
Once we place our entry and stop-loss orders, we merely wait for the trade to unfold while continually moving up our stop-loss with the kijun sen. Price rises nicely for the next 40 days staying well above the kijun sen. After this point, price begins to drop and, on the 44th day, price crosses the kijun sen and hits our stop-loss at point D closing out our trade and netting us a profit of 641 pips.
Kumo Breakout
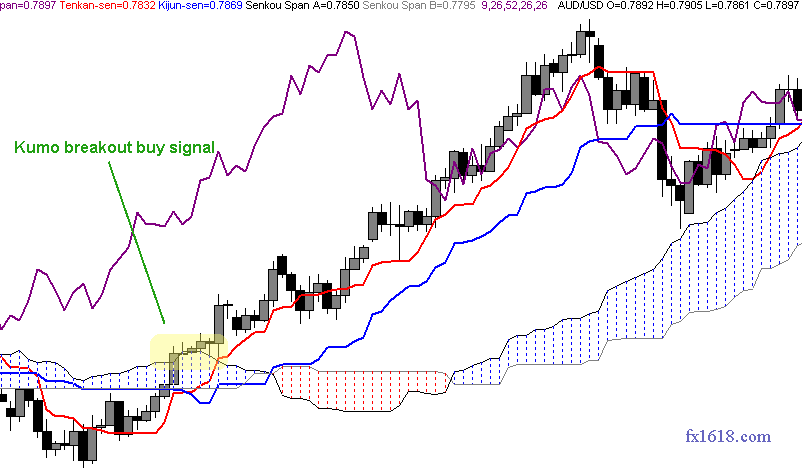
Kumo Breakout trading or "Kumo Trading" is a trading strategy that can be used on multiple time frames, though it is most widely used on the higher time frames (e.g.: Daily, Weekly, Monthly) of the position trader. Kumo breakout trading is the purest form of trend trading offered by the Ichimoku charting system, as it looks solely to the kumo and price's relationship to it for its signals. It is "big picture" trading that focuses only on whether price is trading above or below the prevailing kumo. In a nutshell, the signal to go long in Kumo breakout trading is when price closes above the prevailing kumo and, likewise, the signal to go short is when price closes below the prevailing kumo.
See the chart in Figure V below for an example of a kumo breakout buy signal:
Entry
The entry for the kumo breakout trading strategy is simple - when price closes above/below the kumo, the trader places a trade in the direction of the breakout. Nevertheless, care does need to be taken to ensure the breakout is not a "head fake" which can be especially prevalent when the breakout takes place from a flat top/bottom kumo. To ensure the flat top/bottom is not going to attract price back to the kumo, it is always advisable to look for another Ichimoku structure to "anchor" your entry to just above/below the kumo breakout. This anchor can be anything from a key level provided by the chikou span, a kumo shadow or any other appropriate structure that could act as additional support/resistance to solidify the direction and momentum of the trade.
Kumo breakout traders also make good use of the leading kumo's sentiment before committing to a trade. If the leading kumo is a Bear kumo and the kumo breakout is also Bear, then that is a very good sign that the breakout is not an aberration of excessive volatility, but rather a true indication of market sentiment. If the leading kumo contradicts the direction of the breakout, then the trader may want to either wait until the kumo does agree with the direction of the trade or use more conservative position sizing to account for the increased risk.
Exit
The exit from a kumo breakout trade is the easiest part of the whole trade. The trader merely waits for their stop-loss to get triggered as price exits the opposite side of the kumo on which the trade is transpiring. Since the trader has been steadily moving their stop-loss up with the kumo during the entire lifespan of the trade, this assures they maximize their profit and minimize their risk.
Stop-Loss Placement
Being a "big picture" trend trading strategy, the stop-loss for the kumo breakout strategy is placed at the point that the trend has been invalidated. Thus, the stop-loss for a kumo breakout trade must be placed on the opposite side of the kumo that the trade is transpiring on, 10 - 20 pips away from the kumo boundary. If price does manage to reach the point of the stop-loss, the trader can be relatively assured that a major trend change has taken place.
Take Profit Targets
While traditional take profit targets can be used with the kumo breakout trading strategy, it is more in-line with the long-term trend trading approach to simply move the stop-loss up/down with the kumo as it matures. This method allows the trade to take full advantage of the trend without closing the trade until price action dictates unequivocally that the trend is over.
Case Study
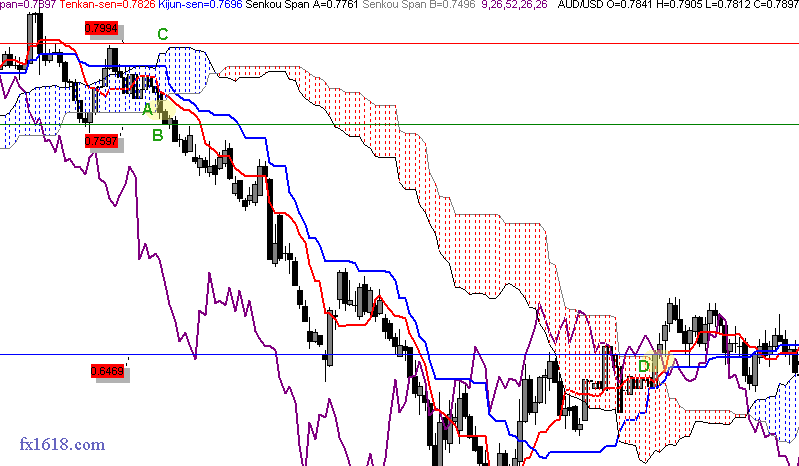
In the Weekly chart in Figure VI below for AUD/USD we can see a bearish kumo breakout taking place at point A. We also see that that leading kumo is distinctly bearish as well, which acts to confirm our breakout sentiment. Given that price is exiting from a flat-bottom kumo and that we want to reduce any risks of entering on a false breakout, we look for a close below the last chikou span support at .7600 before entering. The close we are looking for is achieved shortly thereafter at point B and we enter short.
For our stop-loss, we follow the kumo breakout guideline of placing it 10 - 20 pips away from the opposite side of the kumo where our breakout is taking place. In this case, we place it 20 pips away from the top of the kumo above our entry candle at point C (.7994).
Once we place our entry and stop-loss orders, we merely wait for the trade to unfold while continually moving our stop-loss down with the prevailing kumo. Given that we are using the Weekly chart as our execution time frame, we prepare ourselves for a very long-term trade. In this case, nearly two years later, price rises enough to break out of the kumo to the other side, where it triggers our buy order some 20 pips away at point D netting us over 1100 pips in the process.
Senkou Span Cross
The senkou span cross is one of the lesser known trading strategies within the Ichimoku Kinko Hyo system. This is mostly due to the fact that the senkou span cross tends to be more commonly used as an additional confirmation with other trading strategies rather than being used as a standalone trading strategy in its own right. However, it is nonetheless a solid trend trading strategy and can definitely be used on its own.
Given that the senkou span cross strategy, like the kumo breakout trading strategy, utilize the kumo for signal generation, it is best employed on the longer time frames of the Daily chart and above. The senkou span cross signal is given when the senkou span A line crosses over the senkou span B line of the kumo. If the senkou span A crosses the senkou span B from the bottom up, then it is a bullish signal. If it crosses from the top down, then it is a bearish signal. Nevertheless, like all trading strategies within the Ichimoku Kinko Hyo system, the senkou span cross signal needs to be evaluated against the larger Ichimoku "picture" before committing to any trade.
The thing to keep in mind with the senkou span cross strategy is that the "cross" signal will take place 26 periods ahead of the price action as the kumo is time-shifted 26 periods into the future. This relationship is obvious when one looks at the current price on a live chart, but less so when looking at historical price action. In addition, while all Ichimoku strategies should be exercised with the larger Ichimoku picture in mind, this is particularly important with the senkou span cross. Thus, determining the overall trend on higher time frames first and then taking only senkou span signals that align with that trend on the lower timeframes is the best implementation of the senkou span strategy.
In general, the senkou span cross strategy can be classified into three (3) major classifications: strong, neutral and weak.
STRONG SENKOU SPAN CROSS SIGNAL
A strong senkou span cross signal takes place when the price curve is on the side of the kumo that matches the sentiment of the senkou span cross.
NEUTRAL SENKOU SPAN CROSS SIGNAL
A neutral senkou span cross signal takes place when the price curve is inside the kumo at the time of the senkou span cross.
WEAK SENKOU SPAN CROSS SIGNAL
A weak senkou span cross signal takes place when the price curve is on the opposite side of the kumo that matches the sentiment of the senkou span cross.
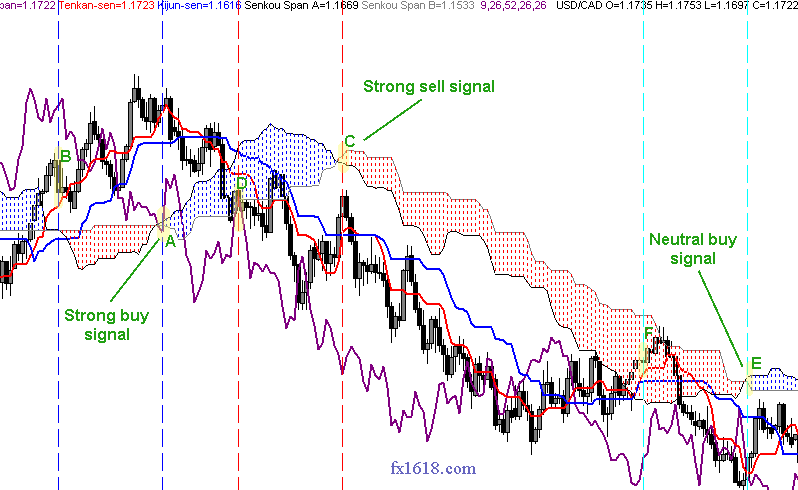
The chart in Figure VII below shows some classifications of the senkou span cross. The dashed vertical lines represent the 26-period relationship between price and the senkou span cross. Thus, point A represents a bullish senkou span cross that can be categorized as a "strong" buy signal due to the fact that price (point B), at the point of the cross, was trading above the kumo. Likewise, point C represents a bearish senkou span cross that generated a strong sell signal due to price's location at point D below the kumo. The senkou span cross at Point E generated a neutral buy signal since price (point F) was trading within the kumo at that point.
Entry
The entry for the senkou span cross trading strategy is relatively simple, though, as mentioned above, entries do require even more attention to the overall trend on higher time frames before executing any trades. After determining the trend on the higher time frames, the trader looks for a fresh senkou span cross in the same direction as the overall trend that has been solidified by a close on the execution time frame. Once they identify a suitable opportunity, they initiate a position in the direction of the senkou span sentiment. As in all Ichimoku trading strategies, traders will be well-advised to consider the relative strength of the cross (vis-a-vis price's location relative to the kumo) as well as the sentiment provided by the remaining Ichimoku components at the time of the cross in order to ensure the most optimum entry.
It is worth mentioning here that the strong bull (buy) signal outlined in our first chart that took place in April of 2005, while technically strong from a 1D perspective, was not aligned with the overall downtrend in-place on the Weekly and Monthly charts. Thus, traders taking this trade signal and using a senkou span cross in the opposite direction as their exit signal would have actually lost pips. This underscores the importance of evaluating sentiment on multiple time frames and trading with the overall trend.
Exit
The exit from a senkou span cross trade is generally signalled by a senkou span cross in the opposite direction of the trade, though other exit signals may be taken depending upon the trader's risk tolerance and profit goals.
Stop-Loss Placement
Being a "big picture" trend trading strategy like the kumo breakout strategy, the stop-loss for the senkou span cross strategy is placed on the opposite side of the kumo that the trade is transpiring on, 10 - 20 pips away from the kumo boundary.
Take Profit Targets
While traditional take profit targets can be used with the senkou span cross trading strategy, it is more in-line with the long-term trend trading approach to wait for a senkou span cross to transpire in the opposite direction of the trade before closing out the position. This method allows the trade to take full advantage of the trend without closing the trade until price action dictates unequivocally that the trend is over.
Case Study
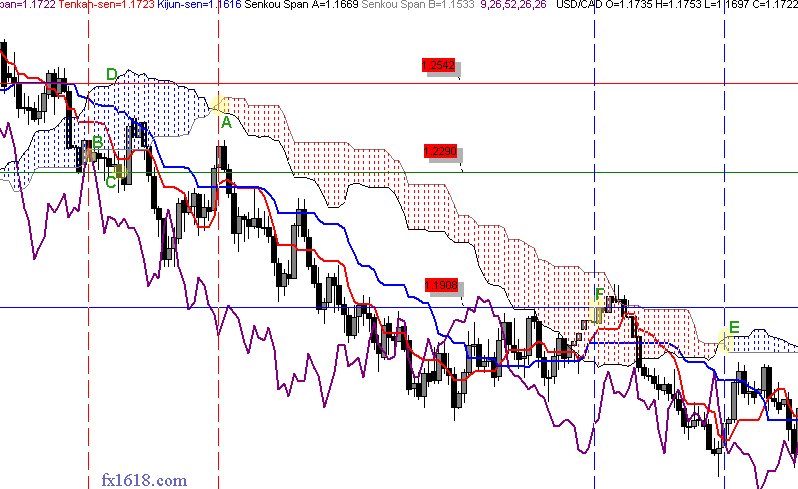
In the Daily chart in Figure VIII below for USD/CAD we can see a bearish senkou span cross at point A. This cross corresponds to the candle at point B. Since the candle closed just below the kumo, the signal is considered a strong one given that its sentiment agrees with the sentiment of the bearish senkou span cross. In addition, we confirm that the direction of this signal is aligned with the overall downtrend in-place on the Weekly and Monthly time frames, so we know that we are trading with the trend. Nevertheless, we are wary of the flat bottom kumo just to the right of the candle, which could act as an attractor for price, so we look for a conservative entry point that will ensure we will not get caught in any false breakouts. The last chikou span support at 1.2292 looks like a good anchor point for assuring this. Price closes below this point a couple of days later at 1.2290 and we enter short at point C.
For our stop-loss, we follow the kumo breakout guideline of placing it 10 - 20 pips away from the opposite side of the kumo where our trade is taking place. In this case, we place it 20 pips away from the top of the kumo above our entry candle at point D (1.2542).
Once we place our entry and stop-loss orders, we wait for the trade to unfold while continually moving our stop-loss down with the prevailing kumo. In this case, a bit more than four months later, price ranging has created a fresh senkou span cross in the opposite direction of our trade at point E, corresponding to the candle at point F where we close out our trade at 1.1908, netting us over 380 pips in the process.
Chikou Span Cross
For those that have been using the Ichimoku Kinko Hyo charting system for any length of time, utilizing the chikou span cross strategy should be like second nature. Why? Because the chikou span cross is essentially the "chikou span confirmation" that savvy Ichimoku traders utilize to confirm chart sentiment before entering any trade. This confirmation comes in the form of the chikou span crossing through the price curve in the direction of the proposed trade. If it crosses through the price curve from the bottom up, then it is a bullish signal. If it crosses from the top down, then it is considered a bearish signal.
Thus, we already know the power of the chikou span cross via its use as a confirmation strategy. However, when used within some simple guidelines, the chikou span cross can be used as its own standalone trading strategy with very good success.
Like many other Ichimoku trading strategies, the chikou span cross strategy uses price's relationship to the kumo to categorize its signals into three (3) major classifications: strong, neutral and weak.
STRONG CHIKOU SPAN CROSS SIGNAL
A strong chikou span cross Buy signal takes place when a bullish cross takes place and current price is above the kumo
A strong chikou span cross Sell signal takes place when a bearish cross takes place and current price is below the kumo.
NEUTRAL CHIKOU SPAN CROSS SIGNAL
A neutral chikou span cross Buy signal takes place when a bullish cross takes place and current price is within the kumo
A neutral chikou span cross Sell signal takes place when a bearish cross takes place and current price is within the kumo.
WEAK CHIKOU SPAN CROSS SIGNAL
A weak chikou span cross Buy signal takes place when a bullish cross takes place and current price is below the kumo
A weak chikou span cross Sell signal takes place when a bearish cross takes place and current price is above the kumo.
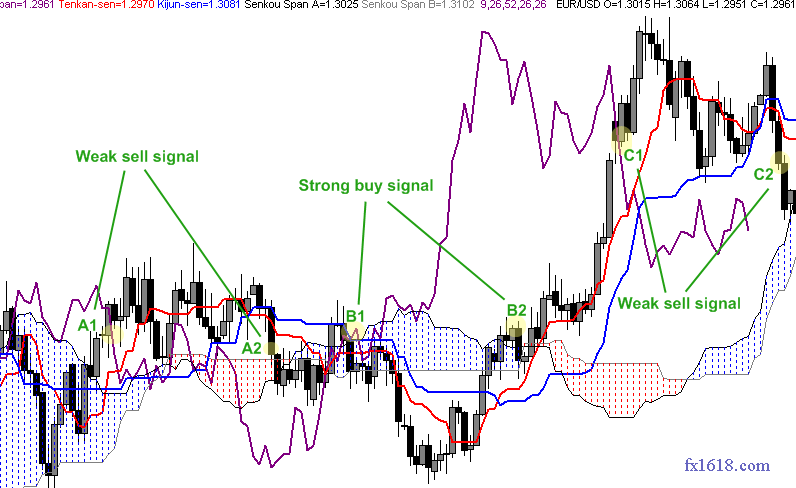
The chart in Figure IX below provides several examples of the chikou span cross. Given the fact that the chikou span is a measure of closing price shifted 26 periods into the past, we must always keep in mind both the location of the chikou span in relation to the price curve (the "cross" itself) and the current candle and its relation to the kumo. Thus, Point A1 is the point where the chikou span crossed the price curve downward and Point A2 is the closing candle that initiated that bearish cross. However, since the candle at Point A2 was above the prevailing kumo at the point of the cross, this particular signal would be categorized as a "weak" bearish cross. A strong bullish cross can be seen in Points B1 and B2 since the chikou span crossed upward through the price curve and the closing candle at that point in time was above the prevailing kumo. Points C1 and C2 represent a weak bearish cross given that they transpired above the prevailing kumo.
Entry
The entry for the chikou span cross is relatively straightforward - the trader initiates a position in the direction of the chikou span cross after taking into consideration the cross's strength and other chart signals. For the highest probability of success, the trader will also look for the chikou span itself to be free of the kumo as the chikou span can often interact with the kumo much like the price curve.
Exit
The most traditional exit for a chikou span cross trade is generally signalled by a chikou span cross in the opposite direction of the trade, though other exit signals may be taken depending upon the trader's risk tolerance and profit goals.
Stop-Loss Placement
The chikou span strategy does not dictate use of any particular Ichimoku structure for stop-loss placement, like some other strategies do. Instead, the trader should consider their execution time frame and their money management rules and then look for the appropriate prevailing structure for setting their stop-loss.
Take Profit Targets
Take profit targetting for the chikou span cross strategy can be approached in one of two different ways. It can be approached from a day/swing trader perspective where take profit targets are set using key levels, or from a position trader perspective, where the trader does not set specific targets but rather waits for the current trend to be invalidated by a chikou span cross transpiring in the opposite direction of their trade.
Case Study
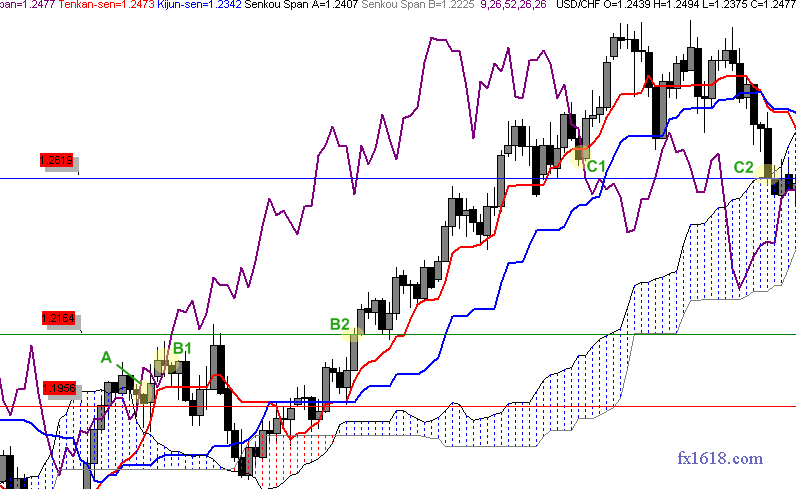
In the Daily chart in Figure X below for USD/CHF we can see a bullish chikou span cross at point A. However, while it is technically a strong cross, the chikou span is still below significant resistance provided by the two chikou span points at 1.2090. In addition, the tenkan sen and kijun sen are in a flat configuration which doesn't provide any additional confirmation. Thus we wait for a more convincing setup before entering Long. This is achieved five (5) days later at Point B1 when the chikou span moves back up through the price curve after a brief dip below. We wait for the daily candle to close and then enter long at 1.2164 at Point B2. Our confidence in this entry is increased by the bullish tenkan sen/kijun sen cross that has since transpired.
For our stop-loss, we consider the prevailing structures and decide to place it just below the kijun sen at 1.1956, since a cross below that point will not only have the chikou span executing a fresh bearish cross, but also have price executing a bearish kijun sen cross, both of which would invalidate our long position.
Once we place our entry and stop-loss orders, we wait for the trade to unfold. Depending upon our trading style, we could opt to trail our stop-loss along with the kijun sen to keep a tighter rein on risk management or we could utilize the more traditional method of waiting for a chikou span cross in the opposite direction of our trade. In this case, a chikou span cross in the opposite direction takes place just under two months later (Point C1) at 1.2619 (Point C2) and we close out our trade for a gain of over 450 pips. It is worth noting that, even though the chikou span cross on its own would be considered technically "weak" due to its location above the kumo, it is bolstered by a bearish tenkan sen/kijun sen cross to form a bearish three-line pattern. Alternatively, if we had chosen to use the kijun sen as our trailing stop in this trade, instead of waiting for a chikou span cross, we would have exited somewhere around the 1.2735 level, which would have netted us over 560 pips.
----------- EDUCATION ---------
-------TRADING METHODS ------
--------- FOR TRADERS ----------
-------------- OTHER ------------
clickable!
---------------------------------------------

_________________________________________________________________________________________________________________________________________

