Thomas Demark method
_________________________________________________________
Tom DeMark is a specialist in the field of technical market analysis and his best-selling book "The New Science of Technical Analysis" released in 1994 spells out some innovative techniques when it comes to the use of trendlines.
How to establish a trend line correctly: TD-points and TD-lines
The notion «trend line» is often interpreted ambiguously and inconsistently. Unfortunately in most cases the procedure of establishing trend lines is personal, though from the variety of these lines only one of them is true.
Thomas Demark developed a method of choosing two points to draw TD-trend lines impersonally (TD is the abbreviation of the author's name and surname). In consequence of usage of this method the graphical analysis of trend lines looses its subjectivity and turns into a mechanical procedure.
The first thing it is necessary to refuse of is forming trend lines form left to right. The current price movement is much more important than the price dynamic in the past, thats why trend lines must be drawn from right to left so that the latest market data are in the right part of the chart.
Points used to draw trend lines are called TD-points and lines themselves are called TD-lines.
Supply price pivot point is a bar with the high which is higher than the highs of the bar to the left and right. Downward trend lines are drawn between the highs of such bars.
Demand price pivot point is a bar with the low lower than the lows of the bar to the left and to the right. Upward trend lines are drawn between the lows of such bars.
To draw a trend line it is necessary to find consequently two TD-points and to draw a diagonal line between them.(Figure 1).
Figure 1. How to draw a TD-line
There are the following truth criteria of TD-points:
- Demand price pivot point must be lower than the close two bars before it was recorded.
- Supply price pivot point must be higher than the close two bars before it was recorded.
- For a demand price pivot point the close of the next bar must be higher than TD Line rate of advance.
- For a supply price pivot point the close of the next bar must be lower than TD Line rate of recede.
These criteria reduce considerably the number of TD-points and TD-lines at the same time increasing considerably their reliability.
Highs and lows recorded not using the truth criteria for TD-points are called «graphical» highs and lows. Highs and lows recorded using these criteria are called «true» highs and lows.
Validation the trendline breakout the first TD breakout qualifier
Once a TD-line has been broken a trader needs to define if the price breakout is true. Thomas Demark singled out three TD Breakout Qualifiers. In this article the fist one will be described.
The first Breakout Qualifier:
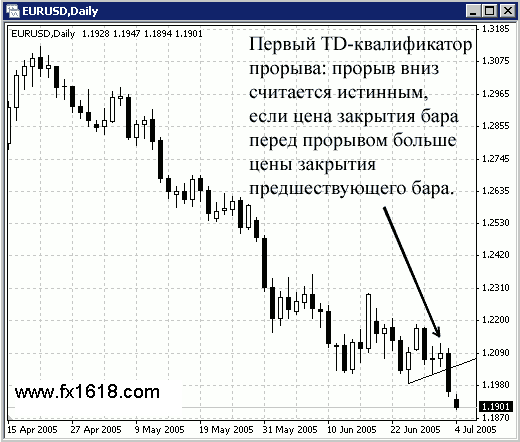
For a downside breakout, the price bar prior to the downside breakout must be an up close (Figure 2). For an upside breakout, the price bar prior to an upside breakout must be a down close.
Figure 2. The first TD breakout qualifier.
Validation of the trendline breakout the second TD breakout qualifier
As the second TD breakout qualifier is stronger than the first one it is reasonable to open a position even in case the first TD breakout qualifier identified a false breakout.
The second TD breakout qualifier:
For an upside (downside) breakout, the current price bars open must be greater (less) than the TD Supply (Demand) Line (Figure 3).
Figure 3. The second TD breakout qualifier.
Validation of the trendline breakout the third TD breakout qualifier
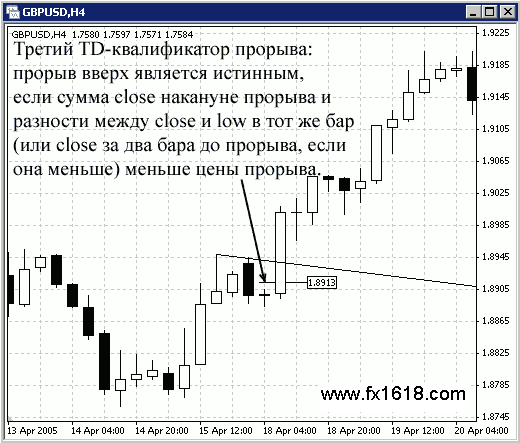
For an upside breakout, the previous price bars close plus the previous bars the difference between the bars close and the low of the same bar (or the close two bars before the breakout if it is lower) must be lesser than the breakout price (Figure 4).
For an downside breakout the difference between the previous price bars close and the difference between the high (or the close two bars before the breakout if it is greater) and the close of the same bar is greater than the breakout price.
Figure 4. The third TD breakout qualifier.
When the TD Line breakout is identified as true, the next step is to set the breakout Price Objectives, i.e. the levels which will be reached after the breakout
What levels the price will reach after a trend line breakout: TD-Price Projector 1
When a TD line breakout is identified as true, the next step is to set the breakout price objectives, i.e. to what the levels the price will move in the direction of the breakout.
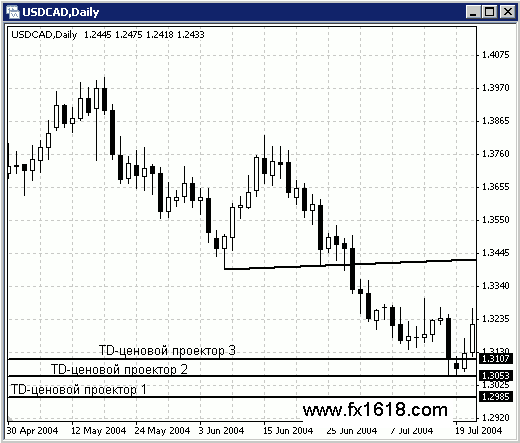
There are three methods to calculate the price objectives after a true trend line breakout. They are called TD price projectors (Figure 5).
TD-price projector 1 is not very precise in comparison to other projectors, but it is simple to calculate:
For an upside breakout TD-Price Projector 1 is calculated as follows: the distance from the lowest price below the TD-line to the price point on the TD-line immediately above it is added to the price at the point of TD-Line breakout.
For a downside breakout TD-Price Projector 1 is calculated as follows: the distance from the highest price above the TD-line to the price point on the TD-line immediately below it is subtracted from the price at the point of the TD-line breakout.
Figure 5. TD-Price Projectors show price objectives after the breakout of the trend line.
What levels the price will reach after a trend line breakout: TD-Price Projector 2
TD-Price Projector 2 is calculated similarly to the first one but instead of the lowest price in case of an upside breakout (the highest in case of a downside breakout) it is required to choose the lowest (highest) price below (above) the TD-line of the bar with the lowest (highest) close. Then this value is added to the breakout price in case of an upward breakout and it is subtracted in case of a downside breakout. Very often TD-Price Projector 1 and TD-Price Projector 2 coincide.
Figure 6. TD-Price Projectors show the price objectives after a breakout of the trend line.
What levels the price will reach after a trend line breakout: TD-Price Projector 3
TD-Price Projector 3 is the most conservative one:
When a downward TD-line (upward TD-line) is broken the projector is calculated as the difference (sum) between the TD-line and the close below it (above it) of the bar when the lowest (highest) price is recorded.
Figure 7. TD-Price Projectors show the price objectives after a breakout of the trend line
Sometimes price objectives fail. It happens as a rule in the following cases:
- When in consequence of a breakout of the reverse TD-line a new signal appears that contradicts to the initial signal. In this case the old signal is replaced by the new one and the price objectives are cancelled.
- When the signal of the TD-line breakout proves to be false. Usually it becomes clear when the subsequent bar after the breakout closes lower (higher) of the broken downward (upward) TD-line.
How to Specify a Trend Strength: Demarker
Formula for DeMarker Indicator:
DeMax ( i ) is calculated.
If HIGH ( i ) > HIGH ( i 1 ) , then DeMax ( i ) = HIGH ( i ) HIGH ( i 1 ), otherwise DeMax ( i ) = 0.
DeMin (i) is calculated.
If LOW ( i ) < LOW ( i - 1 ), then DeMin ( i ) = LOW ( i - 1 ) - LOW ( i ), otherwise DeMin ( i ) = 0.
DMark ( i ) indicator is calculated:
DMark ( i ) = SMA ( DeMax, N ) / ( SMA ( DeMax, N ) + SMA ( DeMin, N ) ).
Where:
- HIGH ( i ) maximum price of the current bar;
- LOW ( i ) minimum price of the current bar;
- HIGH ( i 1 ) maximum price of the previous bar;
- LOW ( i 1 ) minimum price of the previous bar;
- SMA simple moving average;
- N number of periods used for calculation.
Thus, DeMarker Indicator is built on the basis of the following comparisons: if the maximum of the current bar is higher than the maximum price of the previous bar, the corresponding difference is registered. If the maximum price of the current bar is equal or lower than the maximum of the previous bar then a zero value is registered. Thus, the differences got within the period are summed up. The figure we get becomes the numerator of the DeMarker Indicator and it is divided by the same value plus the sum of the differences between the minimum prices of the previous bar and the current one within a period. If the minimum of the current bar is lower than the minimum of the previous bar the corresponding difference is registered, otherwise a zero value is registered.
DeMarker Indicator fluctuates between 0 and 1. The indicator values between 0.7 and 1 form the overbought area, whereas its values between 0 and 0.3 form the oversold area.
DeMarker signals: Bullish divergence / bearish convergence is the main signal indicating the weakness of the current trend (Figure 8); Exit from the overbought (oversold) area when the market is flat is a selling (buying) signal.
Figure 8. Bearish convergence according to DeMarker Indicator
How to Specify a Trend Strength: Overbought / Oversold State
Thomas DeMark has identified two types of overbought or oversold states: extreme and moderate.
Extreme overbought (oversold) state occurs when the indicator is in the overbought (oversold) area for more than 5 bars.
When there is an overbought (oversold) state the indicator is in the overbought (oversold) area for less than 5 bars.
If the indicator having fixed a moderate overbought (oversold) state leaves this area prices downward (upward) reverse should be expected.
If the indicator leaves the overbought (oversold) area after the extreme overbought (oversold) state, as a rule, it doesnt trigger prices reverse. Often the indicator should enter this area once again before the reverse and, having fixed the moderate overbought (oversold) state and bullish divergence / bearish convergence, leave the area. Only after that a trend reverse is possible.
Sequential mechanical trading system of Thomas R. Demark
Sequential is a mechanical trading system developed by Thomas R. Demark. It consists if several stages:
forming of a setup;
intersection;
countdown;
entry ;
close position
Setup
According to this trading strategy any signal starts with forming of a setup for buying or selling.
It is considered that a sell (buy) setup is formed if during at least nine consecutive bars the closing prices were lower (higher) than the closing prices four bars earlier each of the bar of this sequence.
There must be not less than 9 bars in a set up.
Intersection
«Intersection» is the final validation process required to complete the Setup phase of Sequential. .
For a buy (sell) setup Intersection occurs as soon as the high (low) of the eighth or ninth bar is greater (less) or equal to the low (high) three, four, five, six or seven day bars.
If Intersection doesnt occur at the eighth or ninth bar the next phase Countdown can not begin until Intersection occurs. I.e. we wail for the next bar when the intersection of the corresponding bars will occur.
A setup is cancelled in two cases:
«cycling» (will be considered below);
If at anytime prior to the last day of a buy Countdown, a closing price that exceeds the highest high of the most recent buy Setup or if at anytime prior to the last day of the sell Countdown, a closing price exceeds the lowest low of the most recent sell Setup, then the active Setup is cancelled.
Countdown
After the intersection of the setup has occurred (but no sooner than the ninth bar for this setup), the Countdown begins.
For a sell (buy) setup the countdown reflects the relationship between the close and the high (low) two bars earlier. The closing price must be greater (less) than the high (low) two bars earlier. As soon as 13 such prices are recorded (not necessarily consecutive), a signal emerges.
The Countdown phase cant complete earlier than in 12 bars after the setup (it is suggested that the ninth bar is also included in the countdown phase), but as a rule there are 15-30 bars between the setup and the completion of the Countdown phase.
Countdown and setup are cancelled in two cases:
if a reverse setup has developed;
«cycling» occurs, i.e. a new setup in the same direction develops.
Entry
There are three ways to open a position:
- at the closing price of the bar in which the Countdown completes. This is the most risky way as «cycling» may occur;
- after a «flip»: for buying (selling) the closing price must be greater (less) of the closing price four bars earlier;
- after a two-bar «flip»:for buying (selling) the closing price must be greater than the high (less than the low) two bars earlier.
To determine the levels of Stop Loss orders the author used the true price range with the minimum low (the maximum high) for the whole period of the setup forming and countdown for a buy (sell) signal.
There are two exit techniques using Stop Loss:
- The true range is calculated as follows: the low of the bar is subtracted from the high of the bar or from the closing price of the preceding bar if the later is higher. In case of a buy (sell) signal the level of Stop Loss is defined by the way of subtracting (adding) the received value from the low(or to the high) of the bar.
- The second technique is more conservative. A bar to calculate the level of Stop Loss is chosen in the same way. But in case of a long position the level of Stop Loss is determined by subtracting from the low the difference between the closing price and the low; in case of a short position the level of Stop Loss is determined by adding the difference between the high and the closing price to the high.
As a trader entering the market expects to get a profit not a loss, it is important to be able to determine the levels of locking the profit in case of a favorable price dynamic.
There are two ways of exiting the market with a profit:
- if forming of a new set up ends and the price fails to overcome the extreme price level fixed in the process of forming of the most recent inactive setup;
- if a signal of the trend reversal appears.
Sequential is used successfully not only on the daily charts but the author of the method recommended to apply it only on this time period.
Daily Range Projections
Tomorrows price range depends on the close and open prices correlation of the current day. There are three possible relationships between them:
if close < open, then X = ( H + L + C + L ) / 2;
if close > open, then X = ( H + L + C + Í ) / 2;
if close = open, then X = ( H + L + C + Ñ ) / 2.
Forecast maximum tomorrows daily price equals: H+1 = X L, and the forecast minimum tomorrows price is L+1 = X H.
If the market opens within the forecast price range next day traders should expect the resistance level to be on the forecast maximum point, whereas the support level should be on the forecast minimum point.
If the opening price does not fall within the forecast range it is possible to:
ignore the forecast characteristics for this day or
correct the range having moved the forecast minimum (maximum) a bit lower (higher) than the forecast maximum (minimum) if the market has opened higher (lower).


Related Topics

----------- EDUCATION ---------
-------TRADING METHODS ------
--------- FOR TRADERS ---------
-------------- OTHER ------------

_________________________________________________________________________________________________________________________________________
Do you like fx1618?
If you think fx1618.com is cool and want to help fx1618, please tell your friends about it via email and blog (or forum)